NO GOOIES, NO IRRITATION EAR TAPING
Jill Swedlow's
(Aftercare of the cropped
ear)The way in which you care for a cropped ear has a huge influence on whether or not that ear will ever stand properly. There are many methods of aftercare. I don't care for those that enclose the entire ear, creating a natural atmosphere for infection and the dreaded, 'gooies'. The gooies is that gloppy gray gunk that you often find when untaping an ear that has been up for a week or so. The following method will prevent this and is very effective and comfortable for the dog.
Ears should not be taped until most of the scabs are healed after cropping surgery. If there are only 1 or 2 scabs left, you can cover those with cotton and a little of the antibiotic powder, and then tape over them.
You will need1. 3/4" wide smooth plastic hair rollers. Cut 2 strips from one roller, approximately 1/4" wide and the length of the roller. Cut two other rollers as follows. Cut 1/4" wide strips down the length of the roller to within 1" of the bottom. With the hot knife, cut away the unused part of the roller after cutting the strip/stay. (Figure 1).
2. Johnson & Johnson's "Zonas" 1" wide adhesive tape. You'll probably find this at your vets, or a hospital supply although some drug stores carry it. I recently noticed something called "Sports Tape" by Johnson & Johnson in the drug store. It seems to be the same stuff. If you can't find 1" tape, just rip the 1 1/2" lengthwise.
3. Benzoin compound (You might have to order this from a pharmacy)
4. Q-Tips
5. bandage scissors
6. Antibiotic powder, BFI powder or even Dr. Scholls foot powder.
7. alcohol
8. cotton balls
A. After you've cut the rollers, take the 'stay' strip and lay it and the roller/stay combo against the ear. Measure from the 'bump' (Figure 2) to about 1/4" past the tip of the ear. Attach the strip/stay to the roller/stay with adhesive tape. Wrap tightly going a bit above and below the loose parts of the stay.
B. Now take the appliance you've just created and a roll of tape. Start at the roller end. Apply tape to the bottom of the roller where it will contact the ear and wrap the lower half in tape. Cut and push the loose end into the inside of the roller. This helps to protect the 'bump' from the plastic of the roller.
C. Now take a roll of tape and starting at the cylindrical end of the appliance, wrap once around and then stop and begin winding the tape so the sticky side is out. Continue this over the entire appliance, going a little beyond the end of the stay that will be at the tip of the ear. This gives a really strong hold. Set aside and repeat with the other one.
D. Next, cut 4 pieces each of tape long enough to wrap twice around the base of the ear. Approximately 9" long. Cut 2 pieces each of tape, approximately 6" long and 2 pieces 3" in length.
E. PREPARE THE EARS. Clean the ears well with alcohol and dry thoroughly. Next, using a couple Q-Tips, paint the ear with the Benzoin compound. Paint the inside of the ear from the "bump" (See Figure 3) to the tip. Paint the outside of the ear to the tip and pay particular attention to the outside of the base.
Allow to dry until tacky, about 2-3 minutes.
F. Shake a small amount of the antibiotic powder in the little fold at the base of the ear on top of the head. (Figure 3). This will help prevent the "gooies" that usually start here.
G. Next take one of the roller/stay appliances and set it into the inside of the ear just resting on the "bump". Smooth and apply pressure until stuck firmly (Figure 4).
G. Take the 9" long piece of tape and wrap it around the base of the ear and curler as shown in Figure 4. It is important to keep tension on the ear at this point. You want the base pulled out from the head so you can tape it properly in order for it to stand (Figure 5). Wrap in the direction of the small ear fold at base of ear. Wrap snug but not too tight and angle the tape down into the base of the ear where it meets the head (Figure 6).
H. Now take the 2nd 9" piece of tape and wrap it around the ear and roller so that the top edge extends about ¼" above the top of the roller. Tuck the overelap down into the roller after wrapping. The 6" piece goes around the ear in the middle of the ear. Be sure to shape the tape to the ear, not the other way around. The ear edge should remain flat. The 3" wraps the very tip (Figure 6).
I. Repeat the procedure on the other ear. [Note that the ear will be pulled tighter into the roller more than shown in the illustration.] For the first couple tapings after cropping (that is, after the incisions have healed, sutures are removed and the rack is off) it's a good idea to brace the ears across the top of the head. Once the puppy is holding his ears erect, the brace is no longer necessary.
J. BRACING THE TAPED EARS (Figure 7). Cut a piece of "stay" material wide enough to span between the ears without rubbing the ears themselves, usually about 3 to 4". Cut a piece of tape long enough to reach from one ear to the other, circle the ear, return to the first ear, circle it, and wrap about half way back to the other ear. Ears should be held erect, and allowed to turn into a naturally held position, usually slightly out from the side of the head. You'll need a helper here to hold the ears while you tape. (You'll probably need a helper throughout the entire procedure, for that matter!) Start taping at the front of one ear, span to the other, circle it around the back of this ear, to the front span then insert the stay and sandwich it between the two pieces of tape. Continue the tape around the second ear and back across the front. Be very careful not to twist or turn the ears out of their natural resting position. Cut a short (about 2") piece of 1" tape and wrap around the span between the ears a couple times so the stay will remain in place. You're done! Leave ears taped about a week, then take tape off and allow ears to rest for a day. Repeat until the ears are standing.
If the ears constantly flop forward or hang out to the side, you have not taped the bases close enough to the head. You can try putting another wrap of tape around the base and see if that works. If not, you'll have to retape the whole ear.
If, after a couple hours (or days or whatever) you notice that the puppy is scratching a lot at the tapes, or shaking his head and whining, something isn't right. Check the ear for irritation or the appliance for slippage. It's best to untape and then retape the entire ear rather than try a quick fix.
There is no set amount of time it takes before the ears will stand. Average is probably about 3-4 months of taping. Most pups have their ears up by the age of 6 months. However it isn't unusual for some not to stand until they're a year old. Some just have poor ear leather that won't stand or tips that curl inward. That's one of my frequent problems. A poor ear crop can be the cause also.
EAR TAPING ILLUSTRATIONS
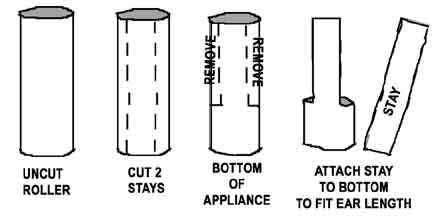
FIGURE 1
|
|
|
|
|
|
|
|
|
|
|
|
|
|
|
|
|
|
|
|
|
|
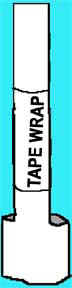
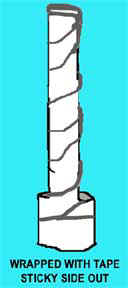
FIGURE 2
On the left is the roller after cutting and attaching the stay to the measured length of the ear.
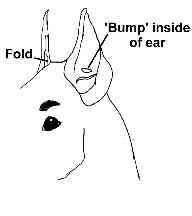
FIGURE 3
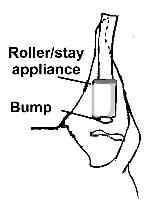
FIGURE 4
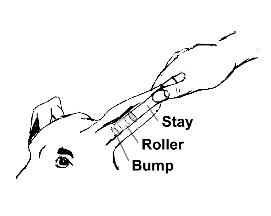
FIGURE 5
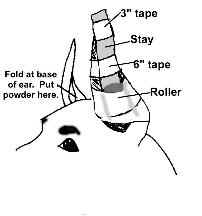
FIGURE 6
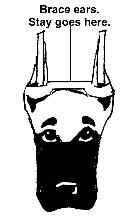
FIGURE 7